Brainstorming the iStorm Way
Now that you and your friend Jane started a brainstorming session, you want to finish it before evening since you have something more interesting to do together later.
Click on the main document window. If the big button at the bottom was green, you will notice it now turns blue. On the other side, it should have turned red, preventing Jane from taking control.
Make some changes to the list. When ready, press the button or hit command-return. Notice that after a brief pause, the button turns green. It means you have updated the shared document with your changes and gave up the control. (If you do not want to lose control, but would like to send update, you could have pressed control-space. That way, the button will still be blue, and would allow you to keep editing.)
Here are some features you may find useful:
Baby TeX
A must for hard-core scientists is to have TeX generated equations. If you have a TeX system with pdf- and latex- capabilities installed on your OS X, you will be able to call it directly from iStorm and embed the TIFF or pdf image of the generated equation in the document. The equation may have an optional icon attached to its end. Double-clicking on the icon will bring up the decoded TeX commands which can then be pasted back into the Baby TeX window by a click of a button to be edited. More details
Baby Math
A must for almost everyone! You have a fully functional calculator on your fingertips right in the middle of writing a paragraph in iStorm. Call up pre-defined universal constant such as speed of light or Planck constant as well as your own. Enclose the expressions in # ..... # and click Command-= to see it replaced by the answer.
More details
The chalkboard:
Any self-respecting scientists/children need to spend some time arguing in front of the chalkboard with their hands and hair messed up with chalk dust. We provide iChalk as a part of iStorm 2.0. Don't use iStorm to play Pictionary, although it is very tempting! More details
The video frame grabber:
 [for v2.5 and later]
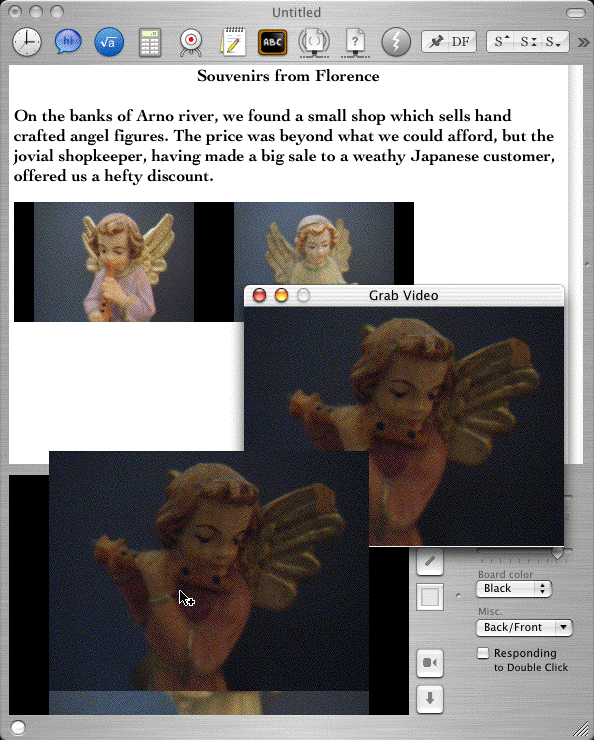
If you have a web cam or a digital video camera, connect it and switch on before starting iStorm. Choose "Show Video Grabber" in the Tools menu or click on the frame grab button in the toolbar. A small window named "Grab Video" will open and show the video in real time as long as the window is active. Click and drag the image either into the iStorm document, iChalk window or Finder. You may use this to write a lab report for your chemistry class using the video footage you made in the laboratory. How about a quick inventory of junks on your desk?
Also, it is appropriate here to point out two useful modules which will be described in detail on their own in later chapters:
SyncPDF (v3.0 and later) and Web Editor. (v3.3 and later) SyncPDF allows you to annotate imported pdf content, and goes an extra step further to let you share those annotations with your peers. It also features synchronized navigation and a cool laser pointer, should you want to use it as the coolest presentation tool on the block!
Web Editor is a useful tool for a group of web programmers (or those who want to learn to program web) as it not only provides a capable web editor and rendering module but also allows you to archive your progress in a very iStorm-ish manner.
Scratch Pad: while you wait....
While Jane is editing the document, you suddenly have a brilliant idea which you might forget in a moment. If such an illusion grabs you, just hit the red button (or command-return or choose from the Tools menu) to slide out the scratch pad. As the document is connected, you will have the option of working on the scratchoad either privately or in a jam-mode where every body can simultaneously modify the text.
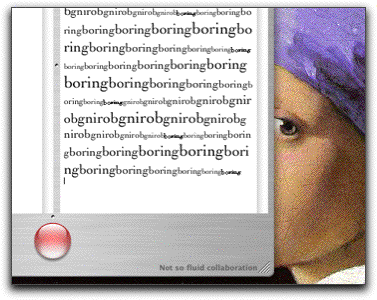 With iStorm vertion 2.61 and later, you will notice that there is a small button on the top-left corner of the scratch pad panel. When it is gray, you are working on the private mode. Scratch pad in this mode is a simple RTFD editor with which you can jot down your precious, but fleeting idea. Nobody but you can see its content. Don't be shy, but ponder on some wild and crazy idea. When the document becomes available for you to edit, just drag its content into the main document. That way, you didn't exactly waste your time while waiting. Only if you are that diligent in real life....
Simultaneous editing in the scratch pad [LAN only]
For some people, collaboration means involving everybody all the way through and through. Press the small gray button in the scratch pad to go into the "simultaneous editing mode". The button will be now lit blue, indicating that you are working on a shared text. (You may not be able to do so if you are connected across the internet.) Once you start typing in the shared scratch pad, you will find that you are assigned a color automatically that highlight everything you type. The color is carefully chosen to make it non-intrusive, and will be remembered throughout the history of the shared document as long as you connect/host using the same name/alias. (See the next section for more on this)
If you like this kind of intense collaboration, you will naturally ask: "Why not make the whole shared document operate in this mode? " The answer is that for the main document, in which we allow all kinds of media to be included, we believe that it creates more distraction than it fosters creativity. A practical concern is that a large graphics file being inserted by Sphinx across the room may cause a significant delay for Heracles here just trying to insert a comma between Chimaera and Ladon.
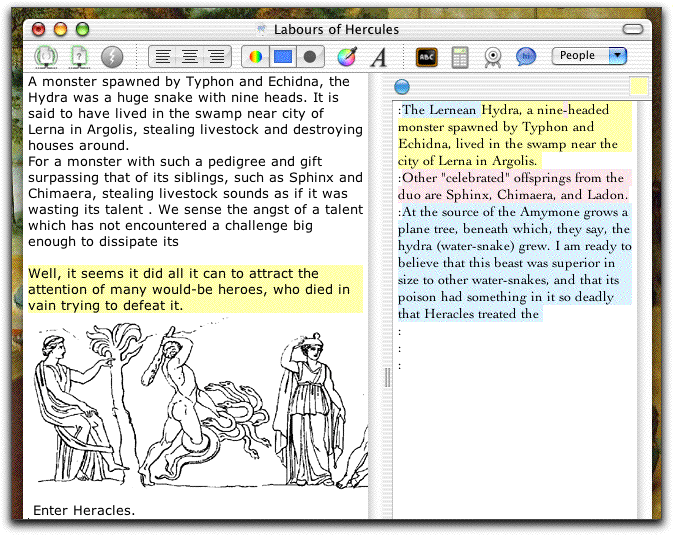 The content of the shared scratch pad is saved along with the local scratch pad content. When you open the shared pad in the local mode, however, its content is available for read-only.
In the read-only state, the small button is lit red as shown in the figure below. Also note that when you join a collaboration, the current content in the shared scratch pad will be replaced by what is on the host's side. A rather drastic behavior, we admit, but a logical one.
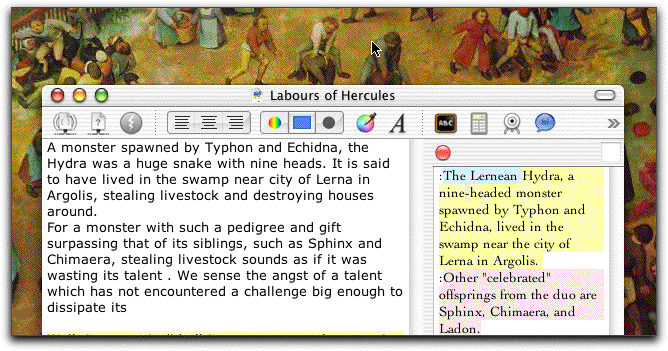 If you need to keep it, make sure you copy the content into either a separate file or into the local scratch pad before joining a party.
An experienced Mac user may recognize the similarity of the shared scratch pad described here and the shared text editor called "Hydra" developed by CodingMonkeys. If your need is geared more to a text-only, extreme-programming type of collaboration, the latter provides an excellent environment to suit your need. One of the irresistible features of the program is that it is free. Keep in mind...
Color identifying members in a shared document
If you were ever a member in collaboration, you have left your mark in the work no matter how important. A stroke of deleting a word may potentially be as important as writing tens of pages. Therefore, iStorm will not attempt anything to judge your value in the group other than keeping a faithful record of your presence, current or in the past history of the particular document.
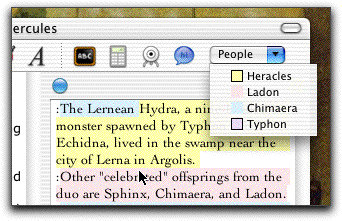
If you are keen about such things, please make sure that you have the Member List toolbar item visible in your toolbar. It is a pull-down menu which will display an accumulated list of participants in the current collaboration. If you were one of the founding members of the collaboration, say a week ago, and even if you didn't contribute anything real important, just like the big-shot professor of yours, your name will be listed with the designated color along with those who are doing all the work.
In the figure shown below, we see four people associated with the document, two active (Heracles and Typhon, with their color square outlined with black line) at the very moment, and two others not participating at the moment. Either they left the collaboration earlier for lunch or do not care about this work anymore since they received their grant.
Highliting in the Main document
While we are on the subject of highlighting, let us mention that with iStorm 2.61 and later, one can also apply the highlighting to the text in the main document. One can have it applied while you edit by toggling the Highlighter menu item [Cmd-Shift H] in the Format menu. You can apply or strip a highlight color to a selected chunk of text or whole document by choosing the Highlight Selection or Strip Hilight menu item in the Format menu. Note that you can do this only in a collaborative environment in which you are assigned a color by the host. In the local mode, you may only strip the highlight.
Of course, please remember that highlight as an author-indentifying feature is useful only if the members do not paste in other highlighted material from outside, or apply the feature in an arbitrary manner. One may also argue against hefty use of highlighting in this context as being petty to grab credits. Not only the final document will look ugly, but also will the collaborative spirit of the group.
iCourtesy: If you take control and do nothing for too long:
It happens all the time. You thought you had such a cool idea and seized the control but immediately hit the writer's block. Then, you just remember the Ben and Jerry in the fridge and suddenly worry that the electricity may be out and it's all melting. Of course, you catch sight of Wallace and Gromit on TV on your way back to iStorm. Being creative is such a hard job!
This is not a commendable behavior! Therefore, after a few minutes (which you can change from the Preferences) of such indulgence, iStorm will automatically yield your control so that other people can do something slightly more useful.
Real time update:

If you and collaborators have fast and robust connection, you can send your update every few seconds (the interval can be changed from the Preferences) to your collaborators while editing the document. You turn this on and off either from the Realtime button in the toolbar or in the Connections menu.
We strongly discourage you from using this feature if you have a slow connection (especially across internet) as it often bogs down the performance due to network contingencies. The situation may turn graver if your collaboration is graphics heavy. As in real life, your collaborators have only limited amount of patience. (iStorm understands it in terms of connection timeouts set in Preferences.)
Use it only to impress your friend still enslaved to the Windows world.
Automatic HTTP link recognition:
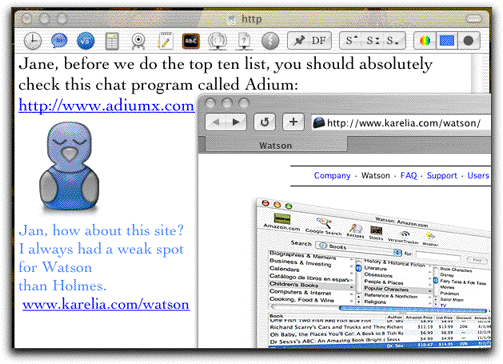
These days, no collaboration is complete without exchange of a few useful http links. If you type a link which starts with "http://", "https://", "www.", "ftp://" or "mailto:" and
ends with a space, iStorm will recognize it upon updating and will create the link for you. If you click such a link in the document, the default web browser will automatically launch to the link. The default is on. You can change this behavior in the Preferences. In the local (unconnected) mode, you can manually activate all http links by choosing the command in the Tools menu.(iStorm 2.0 or later) It can also be done by pressing the big gray button.
If you collaborate on a huge text file and do not care about http links, you may disable the automatic feature in the iStorm Preferences, as it takes up time to go through the entire text whenever the document is updated.
Transferring the text selection range:
As the shared document grows in length, it becomes increasingly difficult to keep track of the changes made by your collaborator.
You may exchange such information through the chatting channel, but another convenient way is to highlight the changed region.
If you made some changes in the middle of the document, say between line 3004 and 3007, just select them before you hit the button or Cmd-Return.
The receiving party will see the selection as the window automatically scrolls to the selected region. (Selection does not work in Real Time mode.)
Drag and dropping jpg pictures:
To include some graphics into the document, the best way is to use a small jpg representation of your graphics file. If you are tempted to dump a 10 mb Photoshop file into the window, think again before you do it: Unnecessarily large graphics means serious performance hit not just for you but everybody in the group! Be nice to others.
An ideal graphics files is the thumbnail picture such as generated by iPhoto, which you find by digging deep into the iPhoto Library folder. They look good only for small sizes, but remember: if you wanted the fully polished pre-press document, you probably chose something like QuarkExpress to begin with. iStorm is rather for the messy brain picking than for polishing! Repeat this sentence five times like a mantra now.
If you still need to send a large file despite this plea, do it only once and suggest others to immediately copy it to a local file, thereby freeing subsequent exchange of content data of the huge burden. We wish we could have this as a built-in feature, but then we would be developing a errrr web-browser.... Right? And we seriously do not want to attract Microsoft's attention by even thinking about it!
With iStorm 1.1 or later, the gray paragraph above does not apply any more. The data transport has become intelligent enough to avoid unnecessary transmission of large graphics files. Roughly speaking it works in a way similar to the "caching" of web browsers.
Please note that some type of gif files may have trouble surviving the trip across network.
Pasting equations or tiff data from other programs:
You can paste equations made with the Equation editor (which comes with the program named Microsoft Office in case you never heard of it) into the document.
Drag and dropping QuickTime media files:
Transmitting Quicktime media data is possible with iStorm. When you drag and drop a quicktime file into the document, (files with extension: .mov, .avi, .mp4, .mpeg, .mpg are currently recognized.) the standard movie player interface will be placed, enabling the movie to be played within the document. When you transmit the document, the movie will be replaced by a movie icon. Double clicking the icon will bring up a simple movie player window which will play in the background.
Note that it is also possible to transmit and play audio data in the same manner. Currently, the following audio formats are recognized: mp3, mid, aif, wav.
But it is not such a good idea to transmit large media clips in a collaborative environment as it will dramatically strain patience of everybody involved. If you came up with a movie, everybody else is bound to come up with his/her favorite clip too! We suggest using a dedicated file transfer program to do it in the background (such as Fetch or Transmit) if you need to exchange a large amount of data (> 1 Mb). Even better: just send the link and let the big boys (Time-Warner or Apple, or whatever) donate some bandwidth for your group!
When you play a media file within iStorm, iStorm uses a temporary media file named "___istorm_mediascratch.xxx" with appropriate extension (xxx=mov, mpeg, mp3 etc...). The file exists temporarily inside the iStorm support directory ([Your Home]/Library/Application Support/iStorm/QT/Temporary) and is deleted when iStorm quits. If you had imported a 2 Gb movie file (God bless you!) and if for some reason, iStorm crashed, it is possible that the 2 Gb temporary file still resides there for no good. It would be a smart thing to do remove it by hand.
Drag and Dropping TeX, text, EPS, RTF, HTML files
If you drag and drop simple text files (which include files with following extensions: .tex, .txt, .html, .htm, .eps) they will initially appear as icons in the main document window. Double clicking on the icon will replace some of them with the text content, permanently incorporating the content into the iStorm document for edit and sharing. Otherwise, as in the case of pdf, html, xml, or htm files, a special module will open.
Command-Dragging out embedded files
Dragging a selection from the main document will display different behaviors depending on the context.
For example, if you drag a selection of text and images and drop into a simple text editor or into Finder,
it may preserve only the text portion of it.
Do the same into a rich text editor such as in Mail or TextEdit, and the rich text format will be preserved.
What if you want to take a dragged in file, which is in the form of a simple icon (such as a movie or html files)
and save it into a stand-alone file?
With earlier versions of iStorm, we suggested the following:
If you desperately need to recover a stand-alone media file from the document,
we suggest you save the document as a rich text file first. Then
control-click on the saved rich text file icon to view its content.
The opened window will show all the media files attached to the document, with somewhat cryptic names.
Just option-drag the desired file to make a copy. Rename it as you wish.
With v3.3 and later, there is a much better way: Press command key while you drag out a file icon from iStorm main document into the Desktop or any location in the Finder. If the original source (somebody must have dragged in a file to begin with, right?) had a name of aFile.mov, then command-dragging it out will produce a file named iStormExp_aFile.mov. This applies also to any Text Attachments created by iStorm including the small envelope icons which contains the TeX or html sources.
Time stamp:
In the Tools menu, you will find an item called Insert Timestamp. It does exactly what it says.
Word count:
In the Tools menu, you will find an item called Word Count. If a block of text was selected at the time you issue this command, the word count will be performed on the selection. Otherwise, it is performed over the whole document. If you were in the middle of completing a word at the end of the selection (or document) it may be counted as a complete word. Please keep in mind that there may be an error by a word in some special circumstances.
Special items in the toolbar
There are some special items in the toolbar. If you have not done so already, select the Customize Toolbar item in the Tools menu to examine available toolbar buttons which are not visible in the toolbar. The following will come handy when you work with a group each member of which would like to keep distinct font characteristics as a way to embed his identity in the characters added.
Strikethru toolbar item:
Sometimes you want to cross out part of the text rather than erasing or replacing them so that your collaborators see the before and the after side by side. These buttons apply or cancel the so-called strike-thru bar across your selection. Note that these buttons work only when there is a range of text selected.
Color toolbar item:
Another useful tool in a collaborative editing is creative use of colors. OS X has an extremely powerful color management tools, but for simple document editing, it tends to be overkill and often confusing. We have devised a very simple color management interface for iStorm. A possible use of color is that each member of the group may choose a favorite color at the beginning of the session. This can be done by clicking on the center of the color toolbar item. It will bring up the color picker panel showing a variety of colored crayons. Choose a favorite color. It will be displayed at the center until you change it to another.
Note that the color displayed does not necessarily match that of the character you are typing. It just shows your choice of color ready to be applied when you dip your pen into the ink to wet it. Suppose you want to add a word in blue in the middle of an existing sentence originally in black.
Move the cursor to the position where the blue word is to be inserted. Click on the left (rainbow) button or press Command-, on your keyboard. You just dipped the pen into the blue ink to wet it. Type in the word. It should come out as blue.


 If you want to insert yet another blue word in the other part of the paragraph, you move the cursor to the insertion point, and click on the rainbow ("dip the pen") again and type. To terminate (or switch back to the default (black) color, you should click on the right ("black") button to "dry the pen" or Command-. (Note also that both dipping and drying functions can be accessible from the Format menu).
Note that you can click either the wet (left) or the dry (right) button to apply it to a selected region of the text.
Note also that when you choose a color by clicking the center button, the pen is already dipped in that color by default.
Remember that the color toolbar has three buttons with functions: "wet"-"choose color"-"dry".
Some users may find this color management somewhat less intuitive. After getting acquainted with how this toolbar item works, most will find it takes full advantage of what OS X provides with minimal interface element. Except for those of you still living in the '60s and trying to design a rainbow T-shirt using iStorm, this tool will satisfy the need of most casual users.
Font toolbar item:
Some people can't stand their day starting with a letter from Helvetica. To set the default font for all new iStorm documents, select a region of text with your desired font or insert the cursor in the zone. You may use the font panel to choose one from. (Choose Show Fonts in the Format menu.) Then click on the "pin" toolbar item shown in the left panel of the picture above. Until you do this again with a different font selection, all subsequent new iStorm document will use the designated font. You may consider the beauty as well as the distinctive character of the font to represent yourself in a collaboration. Generally it is a good idea to avoid an extremely exotic variety if you collaborate with grownups as they tend to get personally offended by a funny font.
Your collaborator may disagree. You find all her writings come back in glorious American Typewriter font and whenever you try to modify a word in her paragraph, the typewriter font is used! (this is the generally the way font works in OS X). In the manner similar to the wet-dry color behavior described earlier, iStorm provides you with a way to easily pick the "pinned" default font of your choice by pressing the "Df" button.
Super/Subscript toolbar item:
We provide a toolbar item to access subscript and superscript buried in the Baseline submenu of Format.
A note on Symbol font:
When life was simpler, there used to be good old Symbol font, which produced alpha when you press "a" and beta when you press "b". With the adoption of 2-byte Unicode standard, it no longer works that simple. Some programs such as MS Word maintains the old functionality, but as of January 2003, Apple has not made up its mind about how it is going to make life easier for us.
For now, the official way to access various symbols and other exotic characters is via the Input Menu. The input menu usually appears system-wide in the rightmost end of the Menu bar, next to the ubiquitous Help item. If you do not see one, do the following:
Open the System Preferences in the Apple Menu. Choose the International item. Choose the Input Menu tab. Find and choose the Greek type and Character Palette if you see one as well as your default language. You will see this adds the desired input method item in the menu bar.
For casual users who need only a couple of Greek letters occasionally, it is quite a burden to do all this. We anticipate that Apple will come up with an improved scheme eventually.
If you have problems or questions:
Real-time mode hardly feels like a real time. Knock-knock, have you heard of something called Hydra?
You may want to adjust the frequency with which iStorm updates the document. (See section on Preferences). By default, iStorm does it every 3 seconds if Real time mode is on. (The person editing the document at the moment should have the option on) It can be adjusted to be faster, but the result may vary on your network capacity and the number of people in the group. We encourage you to use it only when it is absolutely necessary for your collaboration.
There is an interesting notion originating from either Borel or Huxley that randomly typing monkeys could eventually produce a Shakespeare.
It had been estimated that it would take about 10^1017 years to come up with 23rd Psalm. Recent scientific study indicates that monkeys showed preference to certain keys over others, when they were not busy defacating the keyboard.
With this in mind, we believe that well-implemented constraint mechanism is as important as seamless access to the shared content for a creative collaboration.
For example, we use certain cues/gestures to sequentially coordinate the threads in a conversation.
To be fair, we would like to point out that a simultaneous jam-editing may be useful for a group of highly caffeinated people working on a deadline. If you are an aspiring monkey, or if you belong to a highly skilled and disciplined extreme-programmer, and if the shared scratch pad fails to satisfy your urge, you may try Hydra by CodingMonkeys, a very impressive shared text editor which enables a group of people to work on a text simultaneously.
Nothing happens in the Baby TeX module
You may not have installed the required TeX programs. Please consult the Baby Tex section of the manual for more details.
I connected the camcoder, but the frame grabber still complains that there is no video source.
You may have switched on the video camera after iStorm launched. Please quit iStorm, make sure the camera is turned on in a appropriate mode, and re-launch iStorm.
I connected my digital camera and the video grabber doesn't work. Please don't tell me that digital camera is not a video source!
Unfortunately, digital cameras do not interact with your computer as the camcoders do, and iStorm is not yet capable with utilize digital camera input. We heard rumours that one may force some special brands of digital camera to work like a web-cam, but we could not verify it.
Any luck with analog video camera?
If you have a third party video card installed on your machine and if the Mac receives video signal from an analog video source, it may possibly work without glitch. However, we could not test this possibility ourselves. Please let us know your story, if you had success with it.
Naturally, I wonder why real-time movie capture is not offered?
Given the array of Quicktime functions utilized by iStorm, it is indeed natural to expect so. However, real time video grabbing is a very intensive process and
likely to conflict with the idea of seamless collaboration. If you doubt this, try video capture in iMovie and feel how it affects other processes. Furthermore, while recognizing that it could be essential for some type of collaboration, we believe that exchanging a few frames may often be more productive.


