Web Editor
[ For iStorm 3.0 or later running on Panther 10.3 or later versions of OS X ]
Jan now wants to use iStorm to edit his extensive web site with some help from his pal, Jane, who happens to be (quite predictably by now) the more capable of the duo.
With iStorm 3.1, he now finds that there is an item called Show Web Editor (Command-Shift-W) in the Tools menu. Upon choosing it, it opens an embarrassingly empty window. He types in the upper part of the window the only html code he can remember how to write:
<H1>Jan's Webpage</H1>
and press the "Update from" Text button. He finds that the lower half of the panel now displays the rendered web page. He thinks: Hmmm. I can use this to write all my web pages and blogs from now on. Maybe I can teach Jane a trick or two about how to write html code.

Unfortunately, he immediately hits the html-writer's block and can not proceed further. So he decides to do some creative borrowing. In his home directory, there is a folder named Sites which contains bunch of html files. In there, he remembers that Jane had made a folder called test and left some files there when she was trying to teach Jan how to make a web page.
He finds two files
(Home)/Sites/test/index.html
(Home)/Sites/test/head.gif .
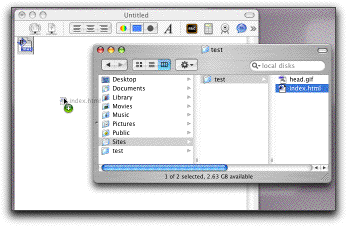
He drags the file index.html into the main document window of iStorm. He finds that it appears in the document simply as an icon.
(If the Web Editor module was already open by selecting Show Web Editor in the Tools menu,
he could have just dragged the source file into the source editing portion of the module. An disadvantage of doing that will be
the original source file may not be archived as part of the istorm document.)

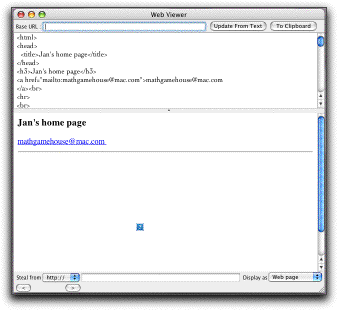
Double clicking the icon opens up the Web Editor window, and this time the source code section is filled with the text of index.html.
<html>
<head>
<title>Jan's home page</title>
</head>
<h3>Jan's home page</h3>
<a href="mailto:mathgamehouse@mac.com">mathgamehouse@mac.com
</a><br>
<hr>
<br>
<IMG SRC="head.gif" WIDTH=490 HEIGHT=238 BORDER=0 ALT="" USEMAP="#head_Map">
<MAP NAME="head_Map">
<AREA SHAPE="poly" ALT="" COORDS="355,84, 349,97, 352,111, 360,113, 368,130, 371,119, 377,114, 386,113, 379,105, 381,91, 369,93, 363,85, 359,84" HREF="http://www.mathgamehouse.com">
<AREA SHAPE="poly" ALT="" COORDS="391,75, 389,99, 430,113, 424,104, 422,94, 423,84, 413,89" HREF="http://www.apple.com">
<AREA SHAPE="poly" ALT="" COORDS="427,16, 417,23, 414,30, 428,40, 440,54, 452,46, 445,31" HREF="http://www.factcheck.org">
<AREA SHAPE="poly" ALT="" COORDS="333,50, 323,50, 316,62, 314,76, 321,80, 334,82, 339,67, 340,49" HREF="http://www.mathgamehouse.com/istorm/">
<AREA SHAPE="poly" ALT="" COORDS="279,65, 276,75, 275,83, 287,84, 296,69" HREF="http://www.mathgamehouse.com/ichalk/">
<AREA SHAPE="poly" ALT="" COORDS="304,21, 316,33, 343,20, 339,5, 315,13" HREF="http://www.mathgamehouse.com/pong/">
<AREA SHAPE="poly" ALT="" COORDS="43,110, 30,109, 33,130, 50,151, 60,160, 57,142, 49,115" HREF="http://www.macthemes.net">
<AREA SHAPE="poly" ALT="" COORDS="178,33, 171,53, 176,59, 180,76, 215,64, 212,48, 206,39, 193,45, 185,36" HREF="http://www.google.com">
<AREA SHAPE="poly" ALT="" COORDS="79,29, 65,39, 54,54, 62,75, 74,88, 87,86, 107,72, 94,46, 84,34" HREF="http://www.cartoonbank.com">
<AREA SHAPE="poly" ALT="Chat with Pat" COORDS="142,111, 131,114, 125,130, 125,137, 133,144, 145,145, 153,134, 153,117" HREF="http://www.mathgamehouse.com/istorm/gallery.html">
<AREA SHAPE="poly" ALT="" COORDS="78,11, 91,24, 109,21, 122,20, 136,20, 136,5, 112,5, 96,5, 83,8" HREF="http://www.mathgamehouse.com/ichalk/actions.html">
</MAP>
<br>
<hr>
</body>
</html>
Looking at the code, it is a fairly accurate rendering of the web page except that the image is not properly displayed.
There is a line in the code which displays the image file:
<IMG SRC="head.gif" WIDTH=490 HEIGHT=238 BORDER=0 ALT="" USEMAP="#head_Map">
Jan realizes that the reason that the image does not show properly is that in the part of the code with
< IMG tag, the location of the image file head.gif is not specified well enough for iStorm to know where to find it. Either it should be modified with an absolute path, or even better, the base url of the code should be specified.
Base URL
To use base url, Jan needs to brush his memory about some basics of web serving. Normally, html sources (.html, .htm files) are placed in a special folder with special user privileges. By default, each user account on OS X has the special folder named as Sites. In case of Jan's account, using his login name jan, the Sites folder is equivalent to the following baseURL:
http://localhost/~jan/
Here we are assuming that Jan's machine is serving web pages. (How? Well, he or Jane probably turned on the personal web sharing option in the System Preferences->Sharing->Services Tab. This starts the Apache web server to serve the html documents Jan has in his Sites directory.)
If, instead, he has an external web server such as http://www.mathgamehouse.com/ , and had taken the source files from that server, the base URL will be different.
Since the test files (index.html and head.gif) were found in a folder named test inside Sites, the base url for any html documents residing in test folder will be then
http://localhost/~jan/test/
It is also possible to use the file:// tag. In that vein, the following will give all equivalent results:
file:///Users/jan/Sites/test/
file://localhost/Users/jan/Sites/test/
file://128.0.0.1/Users/jan/Sites/test/
/users/jan/sites/test/
(This is useful when the base is not located in the usual Sites directory. In the collaboration setting, using a local base such as this is not as good as using a source such as www.mathgamehouse.com/ accessible to everyone for obvious reasons.)
If Jan was not sure about all this, he could have pressed the small arrow button next to the base URL input area to simply use the file navigator to locate the base directory.

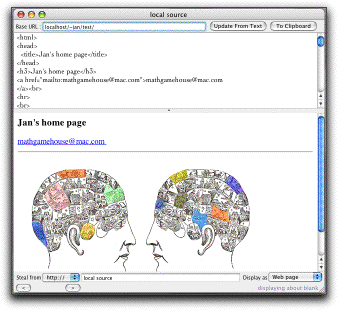
Jan makes a correct guess and type this base url into the input field named Base URL on top of the Web Editor window. Then he presses the button next to it named Update from Text. The result looks very promising now:
With the proper baseURL specified, the web brower built in the Web Editor module of iStorm now understands where to look for the image file. In other words, the browser renders the html source in the upper part of its window, but treats it as if it is one of the html files in the directory specified in the baseURL field. This is very convenient, since you can make many test changes to the text, without affecting what is actually stored in the baseURL or any other directories.
An example of how to use this in a collaborative setting will be the following.
Jane is in Hawaii, Jan is in Bahama. They have a web server running somewhere in California, and its name is www.perpetualvacation.com. They try to make a new page on basic tutorial on web authoring which people all over the world can access by typing www.perpetualvacation.com/webtutor/ in their web brower.
Jane already created a subdirectory in their web site named webtutor, and placed all necessary image files there. They would like to work on a file named index.html to be placed in the webtutor directory first. By setting the baseURL as www.perpetualvacation.com/webtutor/ both Jan and Jane can now modify the source without having to worry about image or other external files that the source uses, as they are fetched from specified baseURL.
Fetch http:// or file://
For inspiration, or out of desperation, one may also visit a web site of a total stranger such as www.apple.com and peek its source code. The button named Steal from: will render the web page specified in the text field next to it.
Just for a fun, Jan goes to his favorite news web site, makes it displayed as source (see below), copies its content to the source editing panel, changes all occurrences of G.W. Bush with his favorite presidential candidates name, renders again by pressing Update from Text button. Something goes wrong...Ahh, he forgot to type in the proper baseURL for the source, which should be now read as www.cnn.com. After he fixes this, this hacked html text is rendered successfully, this time using all the picture images and annoying ads bits that CNN kindly loans Jan for his experiments.
As he looks at the unauthorized version of the news article, he contemplates whether he wants to vote for the candidate or not...
as Webpage/Source/..
To steal properly, the html source of a web page will have to be displayed in text.
It is also possible to display it as Rich text file format, which can then be copied into an iStorm document,
which will treat it as editable RTFD element.
Copy
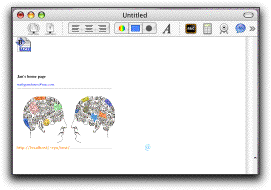
When this button is pressed, Web Editor places a small image of the web page being displaced as well as its html source into the clipboard as RTFD data. Try pasting the content back into the main iStorm document.
You will see a snapshot of the web page accompanied by a small icon showing @ in
blue color to its right.

The image itself is a simple dummy TIFF image.
On the left bottom corner, it will display its origin in orange color for your reference.
The blue @ symbol, however, contains the source text attached to it.
When you double click on @ icon, it will take the source and also attached baseURL and display/render it in the Web Editor window.
One can imagine that Jan will now spend an hour creating various variations of his web page and faithfully archive to preserve how it evolves.
Jane will of course try to erase them all later.
[Some web sites will give an inverted image for one reason or another. In that case, choose the Source and Inverted Image item when you press the Copy button.]
Questions and Incomplete Answers
How can I serve a web page beyond LAN?
To make your local web contents visible to outside world, you will have to take some steps very similar to the ones you took to serve an iStorm document over the Internet. (Consult the section on serving over the Internet) The critical difference is that for web serving, you first have to enable personal web sharing in the system preferences, make firewall (if you have it on) allow traffic through ports 80 and 427, and finally set the router to forward port calls to 80 and 427 to your machine. You do not need to worry about the last step if your WAN address is the same as your LAN address.
Once this is set up properly, you can then access the local web server on your machine by http://localhost/~jan assuming that your login name is jan. This will make the server to fetch the index.html file in your Sites directory and display in the web browser.
OK. This is enough to get you started!
What is the best way to collaboratively edit a complex html document?
We have described a possible case of Jane and Jan working on a simple web page using a image map stored in a web server, which both of them can reach.
Web authoring evolves rapidly. Therefore, if one wants to develp a state of the art web site with Flash, xml, php, and others, he may find this level of web authoring limited.
If you are one of those sophisticated web developers, please bear in mind how much you paid for the iStorm license, if you paid at all. The point is, iStorm is not a web development system. We added web editor module, since we thought it could be useful mainly for pedagogical purposes or for simple, quick brainstorming on a web page or two.
When I make changes to the html source code in the Web Editor module, does it change what is in the original file or in the base URL site?
No. The only way to record those changes you make is to press the Copy to Clipboard button and then paste it into the main iStorm document window.
If you think you do not need the original source any more, just replace the content of the original html file with the new source code you copy from the Web Editor window. In this case, you may want to use Copy Source Only option.
So, I have archived a series of the html codes and their images.
How do I take the content of what is represented as @ in my iStorm document and save as the regular html or xml file?
Select the @ symbol and Command-Drag (drag the selection while keeping the Command key pressed) the symbol into the Desktop or your destination folder.
It will create a file with a name "iStormExp___scratchxxxx_.html" with xxx representing a unique number used to identify the content in your iStorm document.
If the original source was an xml, it may have xml as an extension. If iStorm fails to correctly recognize appropriate extension, you may have to change it yourself.
In the created file, the first three lines will contain the following comment lines which contains its original context, whether it was a stolen code (from some web sites),
whether it has a baseURL, and the file name if the original source had one.
<!-- filename:yyyy -->
<!-- base:xxxx -->
<!-- stolen: YES or NO -->
These are just for your information.


